
And my failsafe recipe for delicious bulka (and/or challah)…
Although I am not at all religious now I retain a fondness for the Ashkenazi/mid-east European food of my semi-observant north-London childhood. And fortunately, a non-kosher kitchen is no impediment to recreating some of my favourite Jewish foods and dishes. Growing up in 1960’s and 70’s suburban London, one of the advantages of a typical Jewish diet over that of my non-Jewish neighbours, was the quality of the bread we ate. While many of our non-Jewish neighbours were eating exclusively “Chorleywood” and other mass-produced batch-processed loaves, we had a more varied selection of far finer breads.
From Polish and Russian influenced light rye breads and bagels to the biblically derived (descendent of the sacred temple “shewbread”) twin challahs of the shabbat (sabbath) table, our excellent Jewish bakeries sold them all. Moreover, the fact that bakers like Grodzinski used brick ovens, well into the 1970’s meant that even their everyday white bloomers and wholemeal loaves were always perfectly baked.
Grodzinski in particular, produced superb challah in four forms; traditional plaited, round (in the form of a spiral plait) and tinned “bulka”. Their fourth offering, “egg challah” only differed in having more egg, and thus being a richer dough. The use of brick ovens ensured a well-baked, crusty loaf with a delicate dough, that aged rather that went stale. Sadly, from the late 70’s Grodzinski, in common with all their rival bakers moved over to modern steel ovens, and their challah, likewise, became the ubiquitous cottonwool most people eat today.
I don’t think it’s a coincidence that the emergence of the cottonwool variety coincided with a rise in the production of homemade challah as people yearned for a return to the genuine article that was no longer available at their local bakery.
These days, there are literally thousands of recipes available in print and on line for the “perfect challah” and I must have tried a hundred of them. But in the end, I always return to a very simple recipe a friend of my late mother’s (thank you very much Roberta, if you’re reading this), scribbled hurriedly on a piece of scrap paper about 40 years ago.
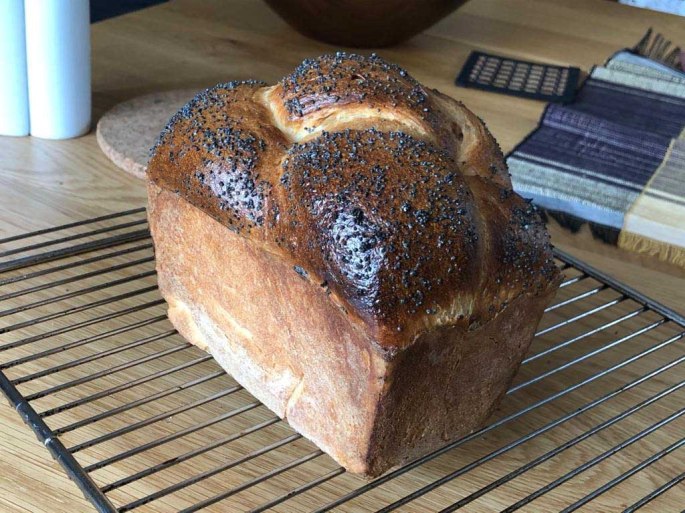
It couldn’t be easier or more reliable, and works equally well for all forms of the bread. Here, I’ve gone with a tinned challah – or bulka, as I knew it as a child. The advantage of bulka is that it slices easily (especially as it ages), and, after a day or two, makes superb toast. Good luck, and Shabbat shalom!
INGREDIENTS (for 1 loaf – double ingredients for 2 etc…):
- 2 cups (about 500gm / 16oz) strong white bread flour, plus flour for dusting
- 1½ packets of powdered (instant yeast – MUST BE FRESH)
- 1 heaped tsp salt
- 2 egg yolks and 1 egg white, lightly beaten
- 1 egg white, lightly beaten and set aside
- 2 tbsp corn, nut or rapeseed oil (NOT olive or sunflower)
- 200ml (12½ fl oz) very warm water (so that you can just put your finger in)
- 1 tbsp white sugar
- several pinches of black poppy seeds
METHOD:
- Chuck flour, yeast and salt into a large bowl and mix well
- Make a deep crater in the middle of the flour with your fist
- Pour beaten eggs, sugar, oil and water in crater
- Using handle of a large wooden spoon (or similar) stir mixture until everything fully integrated, and mixture pulls away from side of bowl
- Pull away dough stuck to spoon handle and start to knead mixture in bowl
- Add flour if too moist and sticky
- Tip dough onto a smooth, lightly floured surface
- Knead dough – adding more flour as required – until smooth and elastic (anything from 3 to 10 minutes, though rarely more than 5)
- Pour a teaspoon of oil into the mixing bowl and coat the bottom and sides
- Place dough back in bowl, cover with a damp tea towel
- Place bowl in a warm, still environment, like an airing cupboard, or near a radiator
- After an hour or so the dough should have at least doubled in size
- Grease a 2pint (1ltr) loaf tin with butter or oil and then dust thoroughly with flour
- Tip dough back onto lightly floured surface and knock back two or three times (about 20 seconds)
- Using a wooden dough slicer (a knife will do), cut dough into three equal pieces
- Roll out each piece of dough into a strip, about a foot (30cm) long
- Roughly plait the three dough strips (this really does not need to be perfect for a bulka)
- Drop the plaited loaf into your prepared loaf tin.
- Cover with the damp tea towel and place back in the warm, still environment to prove for about 40 minutes
- After about 20 minutes set your oven at 250°c (480f).
- Dough is ready when pushing up the tea towel above the level of the tin rim
- Gently, brush all the exposed dough with the reserved egg white
- Sprinkle generously with the poppy seeds
- Place in the oven
- After ten minutes, reduce oven to 190° (370f) and bake for about another 15 – 20 minutes
- Remove loaf from oven and carefully tip out. If the base of the loaf sounds hollow when flicked with your finger it’s baked. If the base is a little too pale, gently put the loaf back in the tin upside down and bake for a further 5 minutes
- Leave loaf to cool for about an hour. If not saving for shabbat supper or suchlike, slice off the end of the loaf, spread it with lashings of butter and a dollop of good quality jam or marmalade and enjoy the products of you labour!
A final few tips: For “loose” plaited or round challah, use a pizza stone, lightly dusted with corn flower (masa harina – NOT corn starch), for a crustier, better baked loaf. Stale challah makes the best bread pudding, and bread and butter pudding and delicious French toast. Very stale and finely crumbed (I use a coffee grinder), it makes a decadent coating for schnitzel!